


An emergency dentist trip can be costly and sometimes hard to schedule. Temporary tooth fixes can be purchased at local drug stores, large retail stores, online stores, and sometimes at dollar stores. The cost can range anywhere from $1.25 to $40. In this article, you’ll learn three options to temporarily fix a broken tooth at home or on vacation for under $10 – see how they compare!
When someone searches the web for “How to Fix a Broken Tooth at Home” it can be a general term that could be applied to several dental problems. Clarifying what your situation is can help you get the right product. Look at the list below and identify which sentence best describes the dental problem you are interested in:
- A portion of a tooth is broken off.
- A tooth is knocked out.
- A crown tooth or cap is lost.
- A crown tooth or cap has come off and needs to be cemented back on.
- A tooth’s filling is missing.
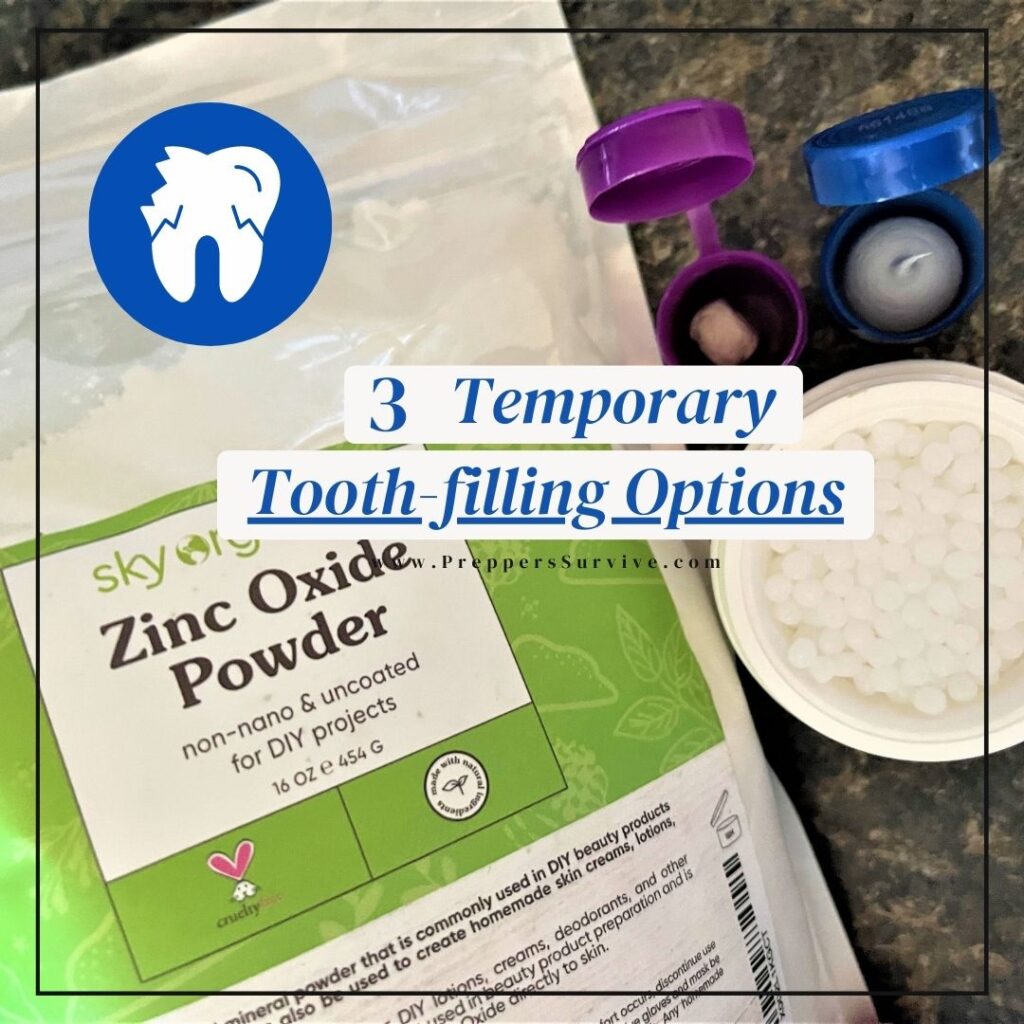
Many people don’t know there are several over-the-counter kits that explain how to fix a broken tooth at home. Some products can provide a temporary tooth, while others offer a quick patch-up. The materials needed to fix a tooth quickly -come in pearls, putty, and zinc oxide powder.
When a tooth needs to be fixed, it may have a small chip, an open hole left by a missing filling, or a larger break exposing the dentin, pulp, or root, which can be uncomfortable and even painful. Temp tooth kits or dental repair kits can seal the area of the troubled tooth, which typically alleviates or instantly stops the associated pain.
Popular brand names to look for in local stores are Temptooth Kit, Dentek, and Dentemp. These products fix different broken tooth problems and cost under $10. Learning what the three quick-fix materials do can help you know which product you’ll want.
{Do not try any of the methods below without reading the product material instructions that come with it. This is not medical advice or dental instructions! It is a summary of products and how they compare. This is not intended to treat, diagnose, or cure any illness. Please, seek your medical physician for medical advice. This is for informational purposes only. See full disclaimer}
1. How to Fix a Tooth at Home Using Pearls

When to use this product:
- a tooth that’s been knocked out
- a portion of a tooth is broken off (Not recommended by the manufacturer but used anyway by people posting on social media. See one example below.)
- a crown tooth or cap is lost (Not recommended by the manufacturer, but it can make a temporary tooth until you can get a replacement.)

These small white pearls are made of polymer plastic. The packaging claims the material to be safe, non-toxic, and biodegradable. Once the material is pliable, it hardens in minutes. A Temptooth can last for months and should not be worn while sleeping. The recommended use from the manufacturer is to “temporarily replace a completely missing tooth and is for cosmetic purposes.” It is not recommended for use of a broken tooth or to replace a missing filling.
However, people have used this product as a temporary fix for a broken tooth (see Youtube below). The simplified instructions are to soak the beads in hot water just under 150°F until they stick together and become pliable. Form it into the shape of a tooth and place it where the tooth is missing. Then shape it using dental tools to match your other teeth’ height. Take out and place the molded shape in cold water to speed up the hardening process.
The fake tooth you made should now be solid white, so if you want to stain it to match your other teeth, soak it in black tea or coffee. Dental pearls are inexpensive (around $7), but a full kit with a large supply of pearls, tools, and instructions is closer to $33.
Below is a video from rapidtronics on how he uses polymer pearls to cap a broken or missing tooth.
– – – – – – – – –
2. How to Fix a Tooth at Home Using Putty

When to use this product:
- a crown tooth has come off and needs to be cemented back on
- a tooth’s filling is missing

A small pea-sized amount of dental putty is all you typically need. Each brand uses their own recipe of ingredients to make a quick-set putty cement. It takes a couple of minutes to apply plus 1 – 2 hours to fully harden.
The moisture from the mouth causes the putty to quicken the hardening process. The simplified instructions on how to fix a broken tooth at home using putty is to take a small amount and roll it into a ball. Then put it in the tooth’s cavity to replace the missing filling. If you’re reattaching a crown tooth, place the putty ball inside the interior of the crown where the fake tooth and real tooth will meet.
This putty sets quickly, drying cement strong. So make sure you don’t want to remove the crown later because you won’t be able to. It is recommended to visit a dentist within 48 hours of use. A loose crown or lost filling repair kit typically costs under $10, but sometimes they can be found at dollar stores for $1.25.
Below is a video from Vans World on how he uses tooth repair putty.
– – – – – – – – –
3. How to Fix a Tooth at Home Using Zinc Oxide Powder

When to use this product:
- a crown tooth has come off and needs to be cemented back on
- a tooth’s filling is missing
If you are into DIY projects then you might prefer this method. You’ll need a few drops of clove bud oil to mix with a small amount of zinc oxide powder to make a paste. Mix quickly and the paste should turn into a putty. Roll it into a pea-sized ball or smaller, depending on the size of the cavity in the tooth. Then place it in the hole for a new filling. If you’re reattaching a crown tooth, place the putty ball inside the interior of the crown where the fake tooth and real tooth will meet. It takes a couple of minutes to make and apply, plus 1 – 2 hours to fully harden.
This paste/putty sets quickly, drying cement strong, so make sure you don’t want to remove the crown later because you won’t be able to. It is recommended to visit a dentist within 48 hours of use. These products may provide a better value over time.
Below is a video from Herbal Prepper on how to mix zinc oxide powder with clove oil to make a temporary tooth filling.
– – – – – – – – –
DIY Emergency Dental Travel Kit

The five items you see in the photo above are simple dental supplies that can temporarily solve many painful dental emergencies. They fit in a snack-size zipper seal bag with instructions I printed out online for each tooth-filling material and how to use it. I also included saline solution packets for a mouth rinse. The dollar store had the putty and dental tools, and the pearls were purchased on Amazon.
The total cost was around $10.
8 Items You’ll Want to Consider – Home Emergency Dental Kit

You can buy an inexpensive tooth repair kit and hope for the best. However, you are here doing some research before you get started. Pat yourself on the back! Learning more, deciding on a plan, and prepping is the best chance to fix a broken tooth successfully all by yourself. An emergency dental kit can help with various dental issues and alleviate pain.
Did you know that “90% of all dental emergencies can be treated by extracting the tooth”? This statistic is found in Joseph and Amy Alton’s book, The Survival Medical Handbook. If you are open to the possibility of removing a tooth, you’ll need a few more tools like a dental extractor and elevator. You’ll also need a guide which you can find in their book under Dental Issues.
Here is a list of items to consider as you gather supplies to fix a tooth at home or on vacation.
- Temporary tooth-filling material (pearls & hot water, putty, or powder and clove essential oil)
- Instructions on using the material properly (not all tooth-filling material come with directions, so look up the directions online)
- Dental tools (dental tweezers, dental mirror, and dental pick can be helpful when shaping) (extractor and elevator for tooth pulling)
- Rubber bite block to keep the mouth open (helpful but not always needed)
- Mirror (if you are at home a bathroom vanity mirror works, if you are traveling a rearview mirror can be used to view the placement of the product)
- A natural antibacterial mouth rinse using salt or essential oregano oil
- Topical dental pain reliever if needed (benzocaine or essential clove oil)
- Antibiotics if needed (13 ways to tell if antibiotics are needed)
This may look like a daunting list, but you may be surprised how many items on this list are found at the dollar store. Other than the antibiotics, the tooth-filling material ($5) may be the most expensive item.
How to Fix a Tooth at Home – Final Thoughts
An emergency dental kit isn’t talked about enough and should be in every home medicine cabinet and first aid kit. Dental problems come unexpectedly and can be remarkably painful. When considering how to fix a broken tooth at home or on vacation, I added the Temptooth kit, DenTek putty, clove essential oil, and oregano essential oil to my travel and home first aid kits.
The Temptooth kit is a little pricey but comes with tools, impression beads, and a step-by-step instruction brochure. Some kits come with a link to an instructional video instead of a brochure. The instructional brochure is worth the extra cost! The brochure has photos and 17 steps that are patented so I cannot show it. It would be hard to remember all seventeen steps so having the brochure is very helpful.
– – – – – – – – –

Leave a Reply